Quick Start - React: Make your first XD plugin with React
While there are many choices when it comes to picking a JavaScript framework to build an XD plugin, we want to cover one of the most popular frameworks, React, first.
Once you're done, you'll have a solid grasp of the steps to take when starting to create your own XD plugin with React.
Prerequisites
- Basic knowledge of HTML, CSS, JavaScript, and React
- A text editor to write your code in (like VSCode, Sublime Text, Brackets, Atom, etc)
- Quick Start tutorial
- node and npm installed
Development Steps
Complete code for this plugin can be found on GitHub.
0. Folder structure
Note that we are going to use webpack to bundle JavaScript files for usage in XD and the yarn package manager to install dependencies. When you have the right structure, it will look like this:
my-plugin-folder
└── src
    └── main.jsx
    └── HelloForm.jsx
    └── react-shim.js
└── manifest.json
└── package.json
└── webpack.config.js
1. Install dependencies
In order to correctly use React in XD, you will have to install dependencies correctly. Follow the steps below:
- List the required dependencies in
package.json
{
  "name": "helllo_react_jsx",
  "version": "1.0.0",
  "main": "main.js",
  "scripts": {
    "watch": "nodemon -w src -e js,jsx,css -w webpack.config.js -x yarn build",
    "build": "webpack --mode development"
  },
  "license": "none",
  "private": true,
  "devDependencies": {
    "nodemon": "^1.18.7",
    "webpack": "^4.16.4",
    "webpack-cli": "^3.1.0"
  },
  "dependencies": {
    "babel-core": "^6.26.3",
    "babel-loader": "^7.1.5",
    "babel-plugin-transform-react-jsx": "^6.24.1",
    "css-loader": "^1.0.0",
    "react": "^16.4.2",
    "react-dom": "^16.4.2",
    "style-loader": "^0.22.0",
    "yarn": "^1.12.3"
  }
}
- List the webpack configurations in
webpack.config.js
module.exports = {
  entry: "./src/main.jsx",
  output: {
    path: __dirname,
    filename: "main.js",
    libraryTarget: "commonjs2"
  },
  devtool: "none",
  module: {
    rules: [
      {
        test: /\.jsx?$/,
        exclude: /node_modules/,
        loader: "babel-loader",
        options: {
          plugins: ["transform-react-jsx"]
        }
      },
      {
        test: /\.css$/,
        use: ["style-loader", "css-loader"]
      }
    ]
  },
  externals: {
    scenegraph: "scenegraph"
  }
};
As per webpack's documentation,
The
externalsconfiguration option provides a way of excluding dependencies from the output bundles. Instead, the created bundle relies on that dependency to be present in the consumer's environment.
Note that, in this example, we are excluding the scenegraph API from the output bundles since this dependency is present in the XD environment.
- Install yarn, if needed
npm install -g yarn
- Install dependencies
yarn install
All dependencies are installed and we are good to go!
2. Create your main files
Now, let's create your plugin files. Open your favorite text editor and create the following files and folders (we'll add code to them in later steps):
manifest.jsonis your plugin’s manifest. This file includes information about the plugin, such as its name, the menu item(s) it adds to XD, and so on. Learn about the manifest here.srcis your plugin's folder that contains all JavaScript files that are going to be compiledmain.jsxis the main file for the pluginHelloForm.jsxis the file that contains the only React component we are going to use. Note that you can have multiple.jsxfiles if neededreact-shim.jsis a JavaScript file that helps React run smoothly in XD's environment. Further details to follow in a later section
3. Edit your plugin’s manifest
In the previous step, you created a file named manifest.json. Open that file and paste in this JSON object:
{
  "id": "QUICKSTART_REACT",
  "name": "Quick Start - React",
  "version": "1.0.0",
  "description": "Description of your plugin.",
  "summary": "Summary of your plugin",
  "languages": ["en"],
  "author": "Your Name",
  "helpUrl": "https://mywebsite.com/help",
  "host": {
    "app": "XD",
    "minVersion": "13.0"
  },
  "uiEntryPoints": [
    {
      "type": "menu",
      "label": "Quick Start - React",
      "commandId": "main"
    }
  ]
}
Be sure to replace the id value with the unique plugin ID you get from the Adobe Developer Console.
"id": "1234ABCD",
Make sure to read Quick Start tutorial to learn how to get your unique plugin ID from the Adobe Developer Console.
If you're curious about what each entry in the manifest means, see the manifest documentation, where you can also learn about all manifest requirements for a plugin to be published in the XD Plugin Manager.
The value of the commandId property may be any string; in this case, it's main. In the next section, we will see how this string is associated with the code for our plugin.
4. Create your plugin’s code
Next, we need to create the JavaScript code for our plugin. As noted in the Quick Start tutorial, the code lives in a file named main.js. This file will be automatically created when Webpack compiles all JavaScript files in your src folder.
In this tutorial, the src folder will contain the following:
src
└── main.jsx
└── HelloForm.jsx
└── react-shim.js
Now, lets start writing code in these JavaScript files.
First of all, as noted earlier, we need react-shim.js file to make React run without any issue in the XD environment. Paste this code into react-shim.js:
if (window.setTimeout == null) {
  window.setTimeout = function(fn) {
    fn();
  };
}

if (window.clearTimeout == null) {
  window.clearTimeout = function() {};
}

if (window.cancelAnimationFrame == null) {
  window.cancelAnimationFrame = function() {};
}
if (window.requestAnimationFrame == null) {
  window.requestAnimationFrame = function() {
    console.log("requestAnimationFrame is not supported yet");
  };
}
if (window.HTMLIFrameElement == null) {
  window.HTMLIFrameElement = class HTMLIFrameElement {};
}
Since XD currently does not currently support cancelAnimationFrame, requestAnimationFrame, and HTMLIFrameElement, we create these empty functions and classes to prevent your plugin from crashing.
As of XD 16, setTimeout and clearTimeout are supported in the XD plugin API, but are still included in the shim for compatibility with older versions of XD.
Next, let's create a React component. Paste the following code in HelloForm.jsx:
// [1]
const React = require("react");
// [2]
const { Text, Color } = require("scenegraph");
// [3]
class HelloForm extends React.Component {
// [4]
constructor(props) {
super(props);
this.state = { name: "" }; // [5]
// [6]
this.onInputChange = e => {
this.setState({ name: e.target.value });
};
// [7]
this.onDoneClick = e => {
// [8]
const selection = this.props.selection;
// [9]
const newText = new Text();
newText.text = this.state.name;
// [10]
newText.styleRanges = [
{
length: newText.text.length,
fill: new Color("#00F"),
fontSize: 50
}
];
// [11]
selection.insertionParent.addChild(newText);
// [12]
newText.moveInParentCoordinates(100, 100);
// [13]
props.dialog.close();
};
}
// [14]
render() {
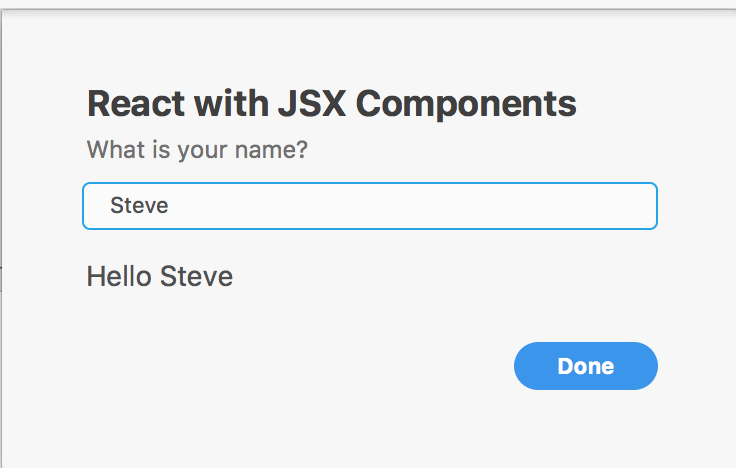
return (
<form style={{ width: 300 }} onSubmit={this.onDoneClick}>
<h1>React with JSX Components</h1>
<label>
<span>What is your name?</span>
<input onChange={this.onInputChange} />
</label>
<p>{`Hello ${this.state.name}`}</p>
<footer>
<button type="submit" uxp-variant="cta">
Done
</button>
</footer>
</form>
);
}
}
module.exports = HelloForm;
This code does the following:
- Gets reference to
reactmodule installed in an earlier step - Gets references to the
TextandColorclasses from XD’sscenegraphmodule. There are several different API modules you can load usingrequire(). - Creates a react component called
HelloForm - Since you are going to initialize state and bind methods, implements a constructor for this React component and calls
super(props)to use props passed down from the parent - Initializes a state property called
namewith an empty string onInputChangemethod sets thenamestate with the string value passed from the input fieldonDoneClickis triggered after the submission happens and manipulates XD objects- Creates a reference to
selectionpassed down as a prop - Creates a
Textinstance and sets thetextvalue as the input stored in thenamestate - Styles the text. More info on styling text can be found in
how-to-style-texttutorial addChildmethod inserts the created text into the ideal insertion point determined by theinsertionParentproperty of theselectionobject- Moves the added text
100pixels from the top and100pixels from the left of the insertion point - Closes the dialog
- Renders the component. Note that there is an input field to accept user's input and a button for the submission of the input
Lastly, let's create the main jsx file, main.jsx. Paste the following code into main.jsx:
// [1]
const reactShim = require("./react-shim");
// [2]
const React = require("react");
const ReactDOM = require("react-dom");
// [3]
const App = require("./HelloForm.jsx");

function main(selection) {
  let dialog;

  function getDialog() {
    if (dialog == null) {
      // [4]
      dialog = document.createElement("dialog");
      // [5]
      ReactDOM.render(<App dialog={dialog} selection={selection} />, dialog);
    }
    return dialog;
  }

  // [6]
  return document.body.appendChild(getDialog()).showModal();
}

// [7]
module.exports = {
  commands: {
    main
  }
};
This code does the following:
- Loads
react-shim.jsto make React run in the XD environment - Gets reference to
reactandreact-dommodules installed earlier in the steps - Imports our
HelloFormcomponent - Creates a
dialogelement in the document - Renders the imported
HelloFormcomponent and passesdialogandselectionobjects as props. Note that the dialog is reused, so it gets rendered only once. - Loads the modal inside the XD document
- Exports an object, with a
commandsproperty. The value ofcommandsis an object which associates the JavaScript handler function (main) with your manifest'scommandIdproperty. The command ID property name (here,main) must match thecommandIdvalue declared in your manifest exactly.
5. Compile the code
Developement - Run yarn watch to compile the code and watch for changes. This process will create the main.js file to be read by Adobe XD.
Production - Run yarn build to build the final version of your plugin.
5. Run your plugin
So you’ve written a plugin using React! How do we run it?
If you haven’t already done so, launch XD and open a new document. Then navigate to the Plugins > Quick Start - React menu item.
Alternatively, if XD was already open, select Plugins > Development > Reload Plugins.
Congratulations! You’ve built your first plugin using React!
Next Steps
- Learn about debugging plugins
- Follow our tutorials
- See working code in our sample repos on GitHub
- Browse the API references