Quick Start: Make your first XD panel plugin
Let’s walk through creating your first Adobe XD panel plugin together.
We'll keep things simple in this Quick Start tutorial. Once you're done, you'll have a solid grasp of the steps to take when starting to create your own XD panel plugin.
At the end of the tutorial, we'll suggest some next steps for going deeper with the XD plugin APIs.
Prerequisites
- Basic knowledge of HTML, CSS, and JavaScript
- A text editor to write your code in (like VSCode, Sublime Text, Brackets, Atom, etc)
Development Steps
Complete code for this plugin can be found on GitHub.
0. Get a plugin ID from the Adobe Developer Console
Before you start, you'll want to create a plugin project on the Adobe Developer Console.
- Go to the Adobe Developer Console and sign in or sign up
- Click "Create Empty Project"
- Create a plugin project by clicking "Add XD Plugin"
- Give it a project name. Note that this project name is not public; it is only visible to you and can be changed directly on the Console later.
- On the following page, get the 8-character unique plugin ID in the "Plugin Details" section.
- Optionally on the same page, download the starter project, which contains a functioning Hello, World sample plugin.
We'll use your plugin ID in one of the next steps.
1. Identify where your plugins are located
Adobe XD loads plugins that are in development from a develop folder in a specific location on your machine. To get to that folder, simply go to this menu item: Plugins > Development > Show Develop Folder.
This will open the develop folder, which we'll use in the next step.
2. Create your plugin scaffold
Next, you'll need to make a new folder within the develop folder to store the plugin files that you'll create below. Name your new plugin folder anything you like.
Now, let's create your plugin files. Open your favorite text editor and create two files inside of your new plugin folder with these exact names:
manifest.json
This file includes information about the plugin, such as its name, the menu item(s) it adds to XD, and so on.
Learn about the manifest here.
main.js
This file contains your JavaScript code that implements your plugin's functionality.
Learn more about main.js here.
These two files go into your plugin's parent directory. When you have the right structure, it will look like this:
my-plugin-folder
├── main.js
└── manifest.json
It's possible to have more files if you want, but these files are the bare minimum requirement for your plugin to work, and are all we'll need for this Quick Start tutorial.
3. Create your plugin’s manifest
In the previous step, you created a file named manifest.json. Open that file and paste in this JSON object:
{
  "id": "YOUR_ID_HERE",
  "name": "Enlarge a Rectangle",
  "version": "0.0.1",
  "description": "Description of your plugin.",
  "summary": "Summary of your plugin",
  "languages": ["en"],
  "author": "Your Name",
  "helpUrl": "https://mywebsite.com/help",
  "host": {
    "app": "XD",
    "minVersion": "18.0"
  },
  "uiEntryPoints": [
    {
      "type": "panel",
      "label": "Enlarge a Rectangle",
      "panelId": "enlargeRectangle"
    }
  ]
}
Be sure to replace the id value with the unique plugin ID you got from the Adobe Developer Console in the first step:
"id": "1234ABCD",
If you're curious about what each entry means, see the manifest documentation, where you can also learn about all manifest requirements for a plugin to be published in the XD Plugin Manager.
The value of the panelId property may be any string; in this case, it's enlargeRectangle. In the next section, we will see how this string is associated with the code for our plugin.
4. Create your plugin’s code
Next, we need to create the JavaScript code for our plugin. The code lives in a file named main.js, which we created in step #2.
Create a scaffold
Let's create some empty functions first. Copy and paste this code into main.js:
function create() {}

function show(event) {}

function update(selection) {}

module.exports = {
  panels: {
    enlargeRectangle: {
      show,
      update
    }
  }
};
Now, let's look at each function in detail, starting with a create helper function that we'll use to build our UI.
Create the UI
The create function is just a helper function we'll make to help us get started. It is going to create an HTML panel element, insert our markup, and add a click event listener. The function returns our UI in code, but does not display it (we'll get to that next):
let panel;

function create() {
  // [1]
  const html = `
<style>
    .break {
        flex-wrap: wrap;
    }
    label.row > span {
        color: #8E8E8E;
        width: 20px;
        text-align: right;
        font-size: 9px;
    }
    label.row input {
        flex: 1 1 auto;
    }
    form {
        width:90%;
        margin: -20px;
        padding: 0px;
    }
    .show {
        display: block;
    }
    .hide {
        display: none;
    }
</style>

<form method="dialog" id="main">
    <div class="row break">
        <label class="row">
            <span>↕︎</span>
            <input type="number" uxp-quiet="true" id="txtV" value="10" placeholder="Height" />
        </label>
        <label class="row">
            <span>↔︎</span>
            <input type="number" uxp-quiet="true" id="txtH" value="10" placeholder="Width" />
        </label>
    </div>
    <footer><button id="ok" type="submit" uxp-variant="cta">Apply</button></footer>
</form>

<p id="warning">This plugin requires you to select a rectangle in the document. Please select a rectangle.</p>
`;

  function increaseRectangleSize() { // [2]
    const { editDocument } = require("application"); // [3]
    const height = Number(document.querySelector("#txtV").value); // [4]
    const width = Number(document.querySelector("#txtH").value); // [5]

    // [6]
    editDocument({ editLabel: "Increase rectangle size" }, function(selection) {
      const selectedRectangle = selection.items[0]; // [7]
      selectedRectangle.width += width; // [8]
      selectedRectangle.height += height;
    });
  }

  panel = document.createElement("div"); // [9]
  panel.innerHTML = html; // [10]
  panel.querySelector("form").addEventListener("submit", increaseRectangleSize); // [11]

  return panel; // [12]
}
This code does the following:
- Creates a
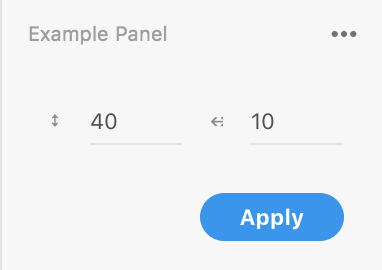
constcalledhtmlfor your UI markup, including elements forstyle,form, and so on. Theformtag contains adivwhich includes two text input fields and afooterwhich has a button for users to click on. Theptag contains warning text which is used to warn users when they select a non-rectangle node inside the active XD document. - Creates a nested function called
increaseRectangleSize. - Gets a reference to the
editDocumentmethod available in theapplicationmodule. - Gets user input value from the "height" input element.
- Gets user input value from the "width" input element.
- Makes a request XD to manipulate the active document by using the
editDocumentmethod. - Gets the first currently selected node. (Some UI logic will be added later to ensure this is a rectangle.)
- Modifies the
widthandheightof the selected rectangle. - Creates a
divelement to serve as a container for your panel UI. - Attaches the HTML created in step #1.
- Adds a submit listener for the
formelement, attaching theincreaseRectangleSizefunction created in step #2. - Returns the panel UI container to be used in the next step.
Show the UI
Next, let's look at the show function. The show function is one of the lifecycle methods for a panel plugin, and the only one that is required. The show function is called when your plugin is made visible to the user.
function show(event) { // [1]
  if (!panel) event.node.appendChild(create()); // [2]
}
This code does the following:
- The
showlifecycle method gives you access to aneventargument which includes anodeproperty that you can attach your user interface to. - Adds the panel UI container returned from the
createhelper function toevent.nodeifpaneldoes not exist in the dom already.
You can also optionally provide a hide lifecycle method for your panel, but we don't need to for this example.
Update your UI
The last lifecycle method, update, is an optional function which is called whenever the user changes the selection in the XD document or mutates a node within that selection. A mutation can be anything, including moves, resizes, etc.
We'll look at this code below:
function update(selection) { // [1]
  const { Rectangle } = require("scenegraph"); // [2]

  const form = document.querySelector("form"); // [3]
  const warning = document.querySelector("#warning"); // [4]

  if (!selection || !(selection.items[0] instanceof Rectangle)) { // [5]
    form.className = "hide";
    warning.className = "show";
  } else {
    form.className = "show";
    warning.className = "hide";
  }
}
This code does the following:
- Uses the
selectionargument.updateprovides two arguments,selectionanddocumentRoot. This example only usesselection. - Gets a reference to the
Rectangleobject imported from thescenegraphmodule. - Gets a reference to the
formelement in your HTML. - Gets a reference to the
pelement with the warning message in your HTML. - Checks if the user has selected anything and if the selection is a rectangle. If this validation passes, the form appears and the warning message is not shown. If not, the warning message is shown to the user and the form disappears.
Export your lifecycle methods
Finally, you need to export the panel lifecycle methods you created:
module.exports = {
  panels: {
    enlargeRectangle: {
      show,
      update
    }
  }
};
The above code exports an object with a panels property. The value of panels is also an object with a property that matches the panelId from your manifest, in this case enlargeRectangle.
Finally, enlargeRectangle is an object containing your panel lifecycle methods. Note that the show lifecycle methods is required for all panel plugins, while the hide and update methods are optional.
5. Run your plugin
So you’ve written a plugin! How do we run it?
If you haven’t already done so, launch XD and open a new document. Then navigate to the Plugins > Enlarge a Rectangle menu item. This will open your panel in the plugin launchpad on the left-hand side of the XD application.
Congratulations! You’ve built your first panel plugin for Adobe XD!
Next Steps
- Learn about debugging plugins
- Follow our tutorials
- See working code in our sample repos on GitHub
- Browse the API references